
SherpaDesk Developer's Corner
Videos are a good choice to attract, engage and bring visitors back to your website and improve the look and feel of your help desk experience. If you are looking for a creative way to get noticed and stand out from the competition, videos are a great option.
Two weeks ago, our CEO had an idea. His idea was to place a cool rocket animation on our Thank You page to improve the overall experience of our website visitors.
Here’s a screenshot of what the video looks like:

My mission was to place this MPEG-4 video onto our website. This became my new web development challenge.
All programmers know that in modern browsers adding a video to a page is as easy as adding an image. You no longer need to deal with special plug-ins or crazy markups, you can do it all with a single element.
Let's jump in with a really simple example:
Wow! Is that all you really need to embed a video on your page?
Generally yes, but the complexity of HTML5 arises not from the syntax, but from browser support and video encoding. Web developers are used to struggling with browser compatibility, but they also have to deal with disagreements among browser vendors regarding codec standards. In order to build a successful HTML5 site, you need to take into account how modern browsers implement HTML5 video web standards as well as how to handle how users view videos on legacy browsers.
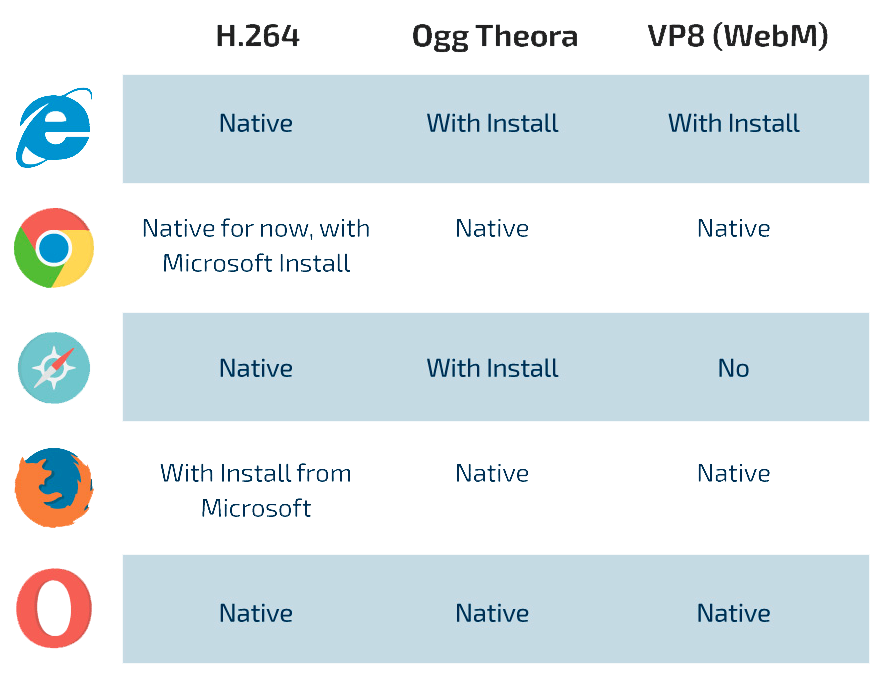
Step 1. Add support for Different Browsers
Your biggest challenge with HTML5 video will be incorporating it in multiple codecs. Currently, each browser has its own preferred video format. It also seems that the fractured implementation of HTML5 video will get worse before it gets better.
You currently have three possible options for encoding video:
1. H.264 – A popular format that can take advantage of hardware acceleration, and is supported by graphics chips in desktops and mobile devices. It's also the default recording format for many of the newer video and mobile devices on the market. However, this format is patented, and while it remains royalty-free for non-commercial use, it could potentially be expensive.
2. Ogg Theora – An open standard that is not patented and is royalty-free. Supported by: Firefox 3.5, Chrome 4, Opera 10.5.
3. VP8 (WebM) – A newer standard recently acquired by Google and released as an open source, royalty-free (but still patented) format. Supported by: Firefox 4.0, Chrome 6.0, Opera 10.6.
Here’s a chart to make it easier to follow:
You also need to convert your video with a video converter.
<source src="HTML5Sample_H264.mov" />
<source src="HTML5Sample_Ogg.ogv" />
<source src="HTML5Sample_WebM.webm" />
</video>
Step 2: Take Control of Video Playback with Parameters
As I said before, in HTML5, embedding video essentially comes down to using a single tag: <video>. But as with any HTML tag, you have a lot of options for parameters.
Here are the essential parameters within the tag itself:
1. SRC - The location and name of the source video, it works the same as the src parameter for the <img> tag.
2. Width and Height - (optional) Dimensions of the video.
3. Controls - Adds a default video control overlay. This is useful if you don’t want to create your own custom control. If you do want to customize the player controls, you can use JavaScript and CSS. The spec allows for manipulation of methods and properties such as play(), pause(), currentTime, volume, muted and more.
4. Preload - Begins downloading the video as soon as the user hits the page. To preload, simply include the attribute. To instruct it not to preload, set the attribute to “none.”
5. Autoplay - This instructs the browser to begin playing the video as soon as the page loads.
Our task is to create a page that plays the video when a user lands on the page, so the complete code looks like this:
Step 3. Add Support for iOS, Android
and Other Device Browsers
You might not know that Safari on iOS requires user input to play media in a <video> or <audio> element. When Safari first supported <video> in iPhoneOS 3, media data loaded only when the user interacted with the page.Therefore, we cannot gain control to autoplay a video. Oops!
The only solution, for now, is to show a Gif animation instead of the video. It’s good to know we can convert video to Gif easily!
The issue is that there are two problems with Gif animations:
1. They play only one time, even when you reload the page. So, I added a date parameter to the end of the Gif name to show the animation on each page load.
2. They do not play smoothly when a file is not fully loaded. Because it’s about 3Mb, it takes two seconds to load. Then it starts showing the animation.
I wrote a simple script, which adds the Gif animation if the user opens the page on a mobile device (not desktop).
// Check if Mobile client
var is_mobile =
navigator.userAgent.match(/(iPhone|iPod|iPad|Android|BlackBerry|IEMobile)/);
// Generate unique Gif link to show animation each page load
var gifUrl =
'https://cdn2.hubspot.net/hubfs/2629098/Assets_Okt_2017/Rocket%20Animation_V2.gif?t'+new Date().valueOf();
//Preload image
var gif = new Image();
//this is Mobile client
if (is_mobile ) {
gif.src = gifUrl;
// Show animation on page only when gif fully loaded.
gif.onload = function() {
$("#rocketMovie").parent().html("<img id=rocketGif style='width: 100%;' BORDER=0 src='"+gifUrl+"' alt='Your app will launch soon...' title='Your app will launch soon...'>");
}
}
</script>
Step 4. Add a poster to Your Video
It's also a good idea to include a poster image that can be displayed until playback begins. This is especially useful for mobile users as it gives viewers a meaningful idea of the content.
Poster - specifies an image to be shown while the video is downloading, or until the user hits the play button. If this is not included, the first frame of the video will be used instead.
Step 5. Remove Video Playback Delays and Interruptions
This is the most important part if you want a smooth user interaction.
In the real world, there can be problems with the WiFi, 3G or other elements that can cause the video to freeze and stop.
To prevent this, we need to make sure that the browser has enough data available to play the video completely without interruption.
This is the trickiest part but also the most important.
I want to share with you my own script that can make running video smoothly under any condition :)
We’ll use a “canplay” event.
"The canplay event occurs when the browser can start playing the specified audio/video (when it has buffered enough to begin)."
The idea is to wait until the video fully loads and then hit play. Not earlier!
Here is my script:
$(function() {
if (is_mobile ) {
return;
}
//add video tag
$("#rocketMovie").parent().html('<video id="rocketMovie" style="width: 100%;" preload poster="https://cdn2.hubspot.net/hubfs/2629098/Assets_Okt_2017/rocket_movie_poster.png"><source src="https://cdn2.hubspot.net/hubfs/2629098/Assets_Okt_2017/Rocket%20Animation_V2.mp4" type="video/mp4" /><source src="https://cdn2.hubspot.net/hubfs/2629098/Assets_Okt_2017/Rocket_Animation_V2.ogv" type="video/ogg" /><source src="https://cdn2.hubspot.net/hubfs/2629098/Assets_Okt_2017/Rocket_Animation_V2.webm" type="video/webm" /></video>');
vid = document.getElementById("rocketMovie");
//listen for CANPLAY event
vid.addEventListener("canplay", function() {
console.log("oncanplay");
setTimeout(function() {
console.log("play");
//Hit PLAY when video fully loaded
vid.play();
}, 500);
});
});
Done!
So, are you interested in seeing the result?
You can check out my handiwork on our Thank You page when you sign up for a Free Trial of SherpaDesk Helpdesk Solution software.
SherpaDesk gives you the ability to use an all-in-one solution that combines the tools you need to run your business more effectively (and the first tech is always free!)
About the Author
Eugene is the Chief Mobile Developer at SherpaDesk. He's a graduate of the Dnipropetrovsk National University in Oblast, Ukraine where he studied programming and English.Other technologies in his knowledge arsenal include Web development, SQL, Java, databases, and scrum. In his spare time, he likes to participate in IT and help desk forums as an active contributor and blogger.


comments